File Referencing in Maya is invaluable for any animation pipeline, especially projects involving characters. To get the most out of reference, following a few key steps can save a lot of head ache later on down the line.
First off, what is file referencing and why is it so valuable?
Referencing allows you work on temporary assets that can be updated in your existing file throughout the project pipeline. This process can blur the point where one artist's work is done and the next can start, as in the model is finished and is now ready to rig. In this write up, I'll be referring to Character Rigs being the file that's referenced, however you can also reference environments, light setups and many other files.
How referencing applies to an animation pipeline.
You've just received a new character rig and are assigned a new animation shot. So you open the rig file, start setting keys and crafting your animation. A few hours pass when you realize that neck control doesn't work,the right fingers are not bound to the joints, and the UVs are all goofed. So now, to save your animation, you'll have to fix a rig that has been animated and manipulated out of base pose in order to move forward. Not to mention, you'll need to redo these changes or strip out the animation to set the rig back to default, to prevent having to redo these changes on the next animation. A cleaner way of working in this situation is to use File Referencing. With the rig referenced into the animation file, you can save your existing animation, go fix the rig in its own file, reopen your animation and the changes apply themselves.
How referencing can save time.
Once a character model is approved or even their proportions are approved, an Animation rig can be created using that base mesh. This will not be the final rig with all the bells and whisles but will be enough to allow the animator to start previs or blocking in animations. Now you have three different facets of the pipeline working at the same time, instead of "one ends, the other begins". While the model is being finalized, textured, and so on, the rig can be updated accordingly with secondary elements, all while the animation is being created. Once the model is updated in the rig, the next time the animator opens their animation, the latest rig and model will already be there. This sort of overlap can last all the way through a project. Facial animation, mesh swapping on existing rigs, spot fixes on the bind, and other updates can be seen on existing animations all with out transferring the animation to a new rig or having to go in and fix individual files. All and all, this gives the modeler more time to work on the model and see how it's being used, allows the setup artist to build to the animator's need and work within a clean, non animated rig file, and lastly gets rigs to the animators faster to produce initial work and test the setups the technical artists are creating. Along with allowing more artists to work sooner, referencing saves time by creating smaller file sizes, thus reducing save/load times. Since the rig file is not actually in the animation file, the size of the animation file is very small. You are no longer saving the rig in each file over and over, even more beneficial if the scene has more then one character. This same process is great for a heavy environment. Since the animator will probably only need to know the ground plane and the objects the character interacts with, having tons of buildings and set dressing will only slow down the playback and bloat the file size.
The importance of a clean Rig file that's being referenced.
Before you start referencing, it's best to have a clean file that's brought into the animation scenes. Here are some general guide lines to touch up a rig file to make it as solid as possible to prevent errors and breaking.
Save your rig as an ASCII file. Ascii file's are not compressed and allow the users to edit the data inside the file. Such as an Outsource Artist changing the version of maya needed to open the file.
UV information can cause a lot of mesh skewing, be sure to delete history (or non deform history) whenever possible.
Skinned objects that have transforms (such as translate x = 0.4) can cause skin weighting to break. Make sure the mesh is clean and optimized before rigging.
Delete anything that's not necessary to the animator that may have been left over from either the model or early rigging steps. Items such as image planes, duplicate shaders, unknown nodes, extra layers (display and render).
Delete History and Freeze Transformations on everything you can. This reduces the amount of nodes and connections being referenced. If a mesh doesn't need History, cleaning it up is always good.
Group the rig elements under a single group. Since the Animator cannot change the outliner once the file has been referenced in, making the outliner as clean as possible in the rig file will be appreciated.
If working with Character Sets (which I highly recommend), create the set before any animation is started. Even if not all the controls are ready. If the rig is referenced and keys set before the set is created, the existing keys will not go inside the character set and can break the connection to the channel and set.
Name your elements. In the vein of keeping your scene clean, proper naming can reduce clutter and creation issues later on.
Making updates seemless in the pipeline.
Now that you have a clean Rig file that's ready to be referenced, it's time to make sure that any updates you do will allows go to the animator's file. The easiest way to make this possible is by only having a single Rig file per character, named accordingly. The rig file, "Ogre_Character_Rig.ma" should be your master rig file naming scheme. Though it may be tempting to start putting version numbers on the rig's file name as its been updated, this will actually cause more headache then its worth. Heres why:
Once the rig is referenced, Maya will always look for that exact file name in that directory. So, before it was looking for Ogre_Character_Rig.ma, but that file no longer exists, since Ogre_Character_Rig_01 is the latest.
Mistakes happen, especially at the end of projects when the hours get long and as projects get larger more people touch these files. Removing any other options or possible errors will prevent simple mistakes.
Relying on Animators, Lighters and anyone else after the setup artist to go in, re reference the latest version of the rig is bound to fail. Instead, having only one file will make it so no matter who opens these files the latest work will be shown.
How to setup a File Reference.
As your about to start an animation, you should have a character rig file as a seperate file, for this write we'll call the rig file "Ogre_Character_Rig.ma". So, to create a reference:
File > New Scene
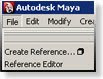
File > Create Reference > Option Box
Reference Options > Edit > Reset Settings
Reference Options > Resolve "All Nodes" with "this String:" > "Ogre"
Click Reference
Select your rig file, in this case Ogre_Character_Rig.ma
So what have we done and why.
By resetting the options, this clears any custom settings that might have been set. Once you get familiar with this process you will no longer need to do this. However, for this example this makes sure we're all using the same settings. Next we resolved all conflicting nodes with a string instead of the file name. There are a number of reasons for this, such as:
File names can get long. Since the file name will be used as a prefix, it will make it difficult reading the layers, shaders, and anything else referenced in from that file.
File names can have unknown characters and spaces. Maya needs the string to be valid, so having unknown characters and spaces can break the naming scheme.
Multiple references of the same rig. Say you have a crowd scene or a group of soliders, using the file name will only noty work, but will not help you identify which character your animating.
Character Identification and consistancy. Naming your character will keep elements clean and understandable the larger your file gets. Ogre, Girl, Goblin, ect will allow another user to understand what's what, especially useful if it's their first time using the scene.
The Reference is Set, let Animation begin.
At this point, animation can start and whatever changes are made to the asset in the mean time will be seen as the rig is updated. Some more details to keep in mind:
If using character sets in the rig (which I highly recommend), I would suggest going to the start frame of the animation, selecting the character set and pressing 's'. This will key all attributes on the rig.
Referenced characters will not hold a pose set without key frames. If you reference in a rig, move the controls around without setting a key, then save and reopen the file, that value/pose will be lost.
Leave the reference alone as grouping or manipulating the reference can cause breaking.
Some final notes and work arounds for Referencing.
Avoid having double or more references. Try to keep your reference hierachy no more then three files deep, such as:
Rig File > Animation File > Lighting File
Having the files get deeper then this, errors start occuring with the sheer number of prefixes and layers of edit seen in each file. In this case, less is more, so try to work as clean and optimal as possible.
Avoid stacking histories atop referenced assets. A very common history to add is a polySmooth on character for the final render. This polySmooth should be added in the rig file, and it's value adjusted in the Lighting file. If you are to add the polySmooth in the Lighting file, the connection to the mesh can break and future rig updates may cause the polySmooth to break or multiply.
Constraining References to another reference can corrupt the scene. And example being: You've referenced in a Car Rig, then referenced in an Environment with a motion path curve. If you are to constrain the Car rig to the motion path, depending on the order the references load, this can error out. The car rig can become disconnected, the file corrupt or the connections to the path may not exist properly. A more reliable way of working this sort of constraining is, duplicate the curve so that it is not in either reference file, but rather in the animation file, then constrain to the duplicate (non referenced) path.
Avoid Reference > Reload Reference. When the rig or referenced file is updated, a cleaner way of getting the asset is to reopen the scene. If a referenced file has render layers, the objects in the render layers are removed from the render layers.
Closing thoughts.
As seen above, referencing can seem to be a daunting task, but I assure you, it will make your life easier. Having a smooth pipeline and allowing artists longer to work and adjust as the project calls is worth the time spent at the beginning. A stitch in time, so to speak.
Source ... Kiel Figgins !
Click here for his post

.jpg)
