Namaste!
Well this is one of the very first series or you can call it an experimental version of my so called
Blog based "
Open Workshop" which is not just a regular tutorial but a mini course!
In this session we will be talking about the amazing world of
DYNAMIC RIGGING! Yes, you heard it right... So stay on the post people cause it's gonna be a big one :)
Preface!

I have always been fascinated watching cartoons and playing video games from my childhood. I am a real curios person, always wanting to know how! How do they do that!? Well that might be the reason I became a RIGGER! RIGGING is awesome; you get to create a digital PUPPET … the very essence of an illusion of life! Well then let’s get back to the topic. The main focus of this course is Dynamic Rigging. Yeah, Dynamic + Rigging = More Rigging Awesomeness!
What exactly is Dynamic Rigging?
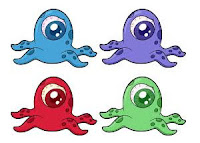
Rigging or setting up a character using the power of dynamics to simulate and match the needs of character design and articulation. It may also be considered as “Icing on the Cake” … to ease the workflow, simulate complex movements that may take ages to be done manually (Hand Keyed)! One of the most important principles of character animation is the Overlapping and Follow through Action. Using the power of dynamics layered on top of the existing rig, we can simulate such movements effortlessly. For example, we can use Dynamic Rigging to simulate the movement of an octopus’s tentacle, animal’s tail, overlapping motion for bird’s wing or a fish’s fin, simulate the motion of a vehicle’s suspension or tank thread, simulate bullet firing from a machine gun, simulate wardrobe and character accessories or use it to simulate muscle and deformation for body and the face and much much more!!!
So what will we be learning?
I will go over some of the different techniques and approaches for doing Dynamic Rigging, which includes an overview and utilization of Maya Hair Dynamics, Soft Bodies and nCloth. Will be discussing on how we can layer the existing rig with dynamics to create some nice follow through movements. Also, going through how we can setup a rig that blends between manual and dynamics setting smoothly. I will try to keep everything as simple as possible.
Before we proceed, let's take a look at some of these interesting links:
P.S. Remember using dynamics does have its Pros and Cons. You won’t get real time feedback, dynamics tend to get slower with more complexity and often time unstable. Therefore, keep it simple and make a habit of saving your files :)
Fundamentals / Hair System #01
People generally tend to see that the hair system is primarily used for stuffs like creating beautiful silky dynamic hair for render. But that is not the case, we as a rigging artist can use the power of hair system to recreate powerful simulation to drive complex animation. You can quickly create Hair on any given surface very easily. Just select the geometry (nurbs surface or polygon with proper UV unwrapped), go to dynamic menu set, click on hair, click the option box to create hair, make sure output is set to nurbsCurve and hit apply. That’s it! Run the interactive playback, move the geometry and walllaaa you have beautiful hair dynamics going on.
Hair system is primarily based on these three components, these are:
- Hair System Node: This is the control house connecting all other components with tons of attributes to play with.
- Follicle: Follicle is a like the root of our own hair. It attach itself to the geometry and follows the it’s movement. You can find the input curve parented to the follicle.
- Curves: These are the driving forces, two simple nurbs curves. One of them is the input curve and the other is the output or dynamic curve. The output curve gives the dynamic simulation based on the movement and position of the input curve.
Other than the above component, paint effects are used for render purpose!
So then, how can we use the hair system in rigging in general! Let’s keep it to the basic shall we :)
Tip #01
Hair system dynamics is driven by curves, yes curves. With curves we can do tons of cool things, it’s simple and fast to compute. Like I said the hair system has two key components, the input curve and the output. Input curve drives the output curve. What if we want to simulate something like a waving flag, or a piece of wardrobe on a character’s body, may be a curtain, rope swinging or just a bunch of hair? Basically, the easiest way is to create a lofted geometry on the output curves. Just make a clean selection of all the output curves and create a loft. The lofted geometry due to the construction history will always follow the output curves and gives you a clean smooth simulation. The lofted mesh can then be used as a driver to drive the original mesh (cloth, hair, flag, shoe lace, pony tail, a bunch of flower, etc). Simply use a Wrap deformer on it. You can always go and tweak the setting till you are happy with the results. Let’s say if you want a wavy motion such as an octopus’s tentacle you can play with the turbulence attribute! Start Curve Attract and Stiffness are sometimes mistaken for same results but these are a bit different. The curve attract tends to match the output curve with the input curve the higher we go with the values, just like blendshapes does. Stiffness on the other hand is like rigidity, the higher we go the stiffer the curve is! Go along play with different settings.
Collision & Constraints (Fun!)
Oh yeah! These are fun to work with …
Collision is an important factor in dynamic simulation. For example, if you want to create a character’s wardrobe colliding with the skin beneath or self collision, you can simply assign a collision object to the hair system. You can add geometry as a collision object or use the hair dynamics native collision objects such as a collision sphere or a cube. Using native collision objects gives you faster and better results.
Constraints on the other hand are used to pin or transform a bunch of dynamic curve. For example, the rubber band constraint like the name states, constraints a bunch of selected curves so that they can be transformed as a whole.
You can always constraint or do some smart parenting on these constraint and collision objects as desired.
Fields (More Fun!)
Dynamic objects can be controlled by using different types of fields. You can find all of them under the Fields menu item for Dynamic menu set. For example, let’s say we wished to create hair (cloth) flowing through the wind (the character is driving on a motorbike), we can easily simulate such motion using the power of fields. You can quickly assign Air field for selected hair system node and ramp up or down the magnitude attribute to simulate such movements.
Fill free to play with all these fields and there settings, I would love to see you drive a wind turbine simulation using this ;)
Building Puppets 101 / Hair System #02
OK! So let’s dive into how we can create a rig driven by hair system dynamics. Like I have mentioned dynamics is driven by input and output curves! The cool thing is that we can create a dynamic curve out of any given curve. For example, just create a simple nurbs 3rd degree EP curve, select the curve and under the hair menu set just click on Make Selected Curve Dynamics. What you end up with is a brand new hair system node, a follicle node containing the input curve and a dynamic curve. Hit interactive playback and try moving the follicle or the input curve, you will notice that the output curve follows the movement with built in dynamics. You can change the setting on the follicle node for Point Lock as Base. The tip of the output curve is no longer attached to the input curve and now you can see nice follow through when played and moved!
Now comes the interesting part, I am sure you are all familiar with Spline IK. Well, when a joint chain is driven by a curve it’s called a Spline IK. We can create all sorts of interesting rig with this powerful tool. No doubt the most used one includes a torso rig or may be a simple tail rig based of Spline IK setup! One cool thing about Spline IK is that we can tell Maya to create a Spline IK based joint chain with the use of a manual custom curve. You can find the option from Spline Ik Handle Setting (Creation Menu), just un-check Auto Create Curve. Now why do we want to do this? Well we want to create a spline IK chain using dynamic curve! Yes the output curve …
Create a regular joint chain along the output curve, snapping each joint on each CV points is a good way to go. Now just create a spline ik chain using the output curve as the driver spline curve. Now comes the magic, with interative playback … try moving the follicle or input curve, you should now notice that the joint chain moves and deformes in relation to the output curve; there you go, you have a simple dynamic joint chain. As we know, joints are used for binding geometrys, try binding a simple cylindrical object to the joint chain. This technique can be applied for creating a tail for example, just parent the input curve to the main root of the character and you should be able to see some nice follow through, overlapping animation. Ramp up some turbulence settings and you get something like an octupus’s tentacles or some weird looking alien tentacles :)
Building a Control Rig / Hair System #03
Ok then, you might be wondering what if we can create a control rig to drive the dynamic joint chain. For now though, we can just select the input curve and move it to control the dynamics.
Well again, since the input curves can be bind to a joint chain; why don’t we just bind it or create some cluster driven setups. So, let us just duplicate the existing dynamic joint chain or may be recreate one. You can now name and call the new one to be input joint chain or the control rig. Simply skin bind the input curve to the newly created input joint chain. The input control joint chain can be moved, transformed and you should notice the dynamic joint chain try to match it. You can play with stiffness and start curve attract values to achieve a desired result.
There is a number of ways how you can drive the existing control joints. You don’t want the animator to be selecting the joints and keying right? So, you can simply create some FK driven control setup. Just constraint the joints using simple controller! OR if you want to leap a bit, let say if your animators want IK driven rig, you can always override the existing rig with another spline ik based controller setup for the input joints!
The layering goes as follows for a hair system based dynamic solution:
FK Controllers > Input Control Joints (Constraint to Controllers) > Input Curve (Skinned to Control Joints) > Output Curve (DYNAMIC) > Output Dynamic Joint Chain (Controlled via Spline IK using Output Curves)
OR
IK Controllers (Cluster Controlled) > Input Control Joints (Controlled via Spline IK) > Input Curve (Skinned to Control Joints) > Output Curve (DYNAMIC) > Output Dynamic Joint Chain (Controlled via Spline IK using Output Curves)
Using these principles and techniques you can create multitudes of dynamic rig; this is the simplest yet the widest applied method to create a dynamic rig. Go on; try yourself to create some tentacles or dynamic rope or mustache/beard, dynamic torso or body setup, bird’s wing and much much more!
Feel free to try these out, this could workout as an assignment for you!
I do have a nice little link to share with you all, check this out.
Tip #02 / Procedural Overlay
Procedural animation is a term used to automatically generate animation in real-time, unlike predefined "hand keyed" animation. Procedural animation allows objects to be animated using a set of rules and procedures to create convincing results from relatively little input. Generally the rules are based on real world physics, expressed mathematically. Animation without a single manual key on the timeline could be also referred to as procedural animation. Generally it is used to simulate a wide array of dynamic solution as well as character animation. For example, if you wanted to create a rotating wheel that auto rotates with the movement of a vehicle, or may be vegetation swaying with the wind, or may be the movement of gears on a mechanical watch, etc.
The idea of this tip is to bring the power out of dynamic rig by layering it on top of an existing procedural rig!
I want to show you a simple example. Let’s create something to simulate the movement of a tail movement, totally automated!
To start with, we need to create a joint chain. Remember the more the number of joint, the more flexible the tail animation becomes.
So let’s think about it, what could be the best solution to simulate the movement of a wavy tail animation. We should all be familiar with Trigonometry from the high school years. Yup, trigonometry which involves sin, cos, tan, etc. Trigonometry is a branch of mathematics which deals with triangles, relationship between a triangles side and its angle.
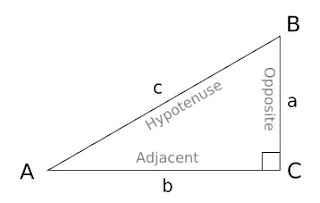 Here are some of the principle equations:
sinA = opposite/hypotenuse = a/c
Here are some of the principle equations:
sinA = opposite/hypotenuse = a/c
cosA = adjacent/hypotenuse = b/c
tanA = opposite/adjacent = a/b = sinA/cosA
sinA and cosA are inverse to each other.
sinA = 1/cosA
cosA = 1/sinA
Basically the idea of using sin and cos to drive a procedural animation gives you a wavy motion, rotation value along an axis that is to and fro oscillating motion. That’s exactly what we needed!
Looking at the Sine Curve equation:
y = a sin t
We can derive an equation based on the Sine Curve to generate the oscillating curve motion. The distance between the highest point of the curve from the horizontal line is the amplitude denoted by "a" and the distance between two highest point denoted by "t" is the frequency of the curve:
Joint Rotation = (sin (* time * frequency)) * magnitude
Joint Rotation (Inverse if sin) = (cos (* time * frequency)) * magnitude
So, we just need to feed these equations to create a new expression. From the expression editor, create a new expression with the use of above sine curve equation.
//Here $mag and $freq are float variables to store some values for magnitude and frequency!
float $mag = 15;
float $freq = 5;
joint1.rotateY = (cos(time*$freq))*$mag;
joint2.rotateY = (cos(time*$freq))*$mag;
joint3.rotateY = (sin(time*$freq))*$mag;
joint4.rotateY = (sin(time*$freq))*$mag;
So, now you should end up with a nice little wavy procedurally driven animation with the interactive playback. You can ramp up and down the magnitude and frequency value to see the changes.
Now, comes the part where it comes to create a dynamic rig. You should now be familiar on how we can do that! Basically we will be layering the hair dynamic rig on top of existing procedural rig.
The layering goes like this:
Procedural Joint Chain > Input Curve (Skinned to Procedural Joints) > Output Curve (DYNAMIC) > Output Dynamic Joint Chain (Controlled via Spline IK using Output Curves)
Go on test it out! The result should come out very interesting … :)
You could do all sorts of cool and crazy things with it! I applied the same techniques to create the Gold Fish Setup.
Example Scene File: I have included a maya scene file for this setup. Find it here:
procedural_dynamic_chain.rar
Some links worth sharing:
Jumping Into the world of Soft & Rigid Body Dynamics 101
The world of Physics! This is where the laws of physics get applied; for example Newton’s laws of motion! Generally in any given software application the laws of physics can be categorized by Soft Body Dynamics and Rigid Body Dynamics. Both of these subject or tool set are used to simulate visually realistic motion. The key differences between these two are like the name suggest; soft body can change shape while rigid body are rigid. For instance in soft body simulation the distance between two points, vertices alter and change while for a rigid body it is always the same. For this reason soft body is used for simulating motion on deformable objects such as cloth, mud, face, muscle, etc while rigid body are suitable for rigid objects like simulating a rock falling off a cliff or a simple domino effect for a stack of cards!
We can enhance or achieve believable deformation and simulation by using the power of Soft and Rigid body dynamics into character rigging.
Tip #03 / Soft Body Dynamic Rigging
Dynamic Joint Chain via Soft Body
We talked about using the power of hair dynamics to simulate the motion of a joint chain! Similarly we can also use the power of soft body dynamics to simulate a dynamic joint chain. Both of these behave in somewhat similar manner!
We know that we can drive the motion on a joint chain by using a dynamic curve via the incredible Spline IK tool. We will be applying the same technique for soft body dynamics.
Remember when hair system dynamics was created we had an input and output curve. We will have to go ahead and create a similar looking setup!
Start by creating a regular joint chain, more the number of joint the more flexible it is! Create a simple 3rd degree EP curve along the chain. Now comes the part where soft body dynamics is applied on the curve. Soft body works on any given geometry including nurbs and polygon for simulating physical simulation based on particle system. You can find the soft body menu items from the dynamics menu set. Simply click on Create Soft Body option box. Make sure that the creation option is Duplicate, make copy soft and also check on Make non-soft a goal. Select the input curve and hit Create. This ensures that the input curve is duplicated; and the duplicate output curve is made soft i.e. dynamic making the output curve to follow the movement and match the position of the input curve! It is just like in hair system dynamic where we output dynamic curve tries to match the input curve. In this case though the input curve is called a goal or a target object.
Now, if you try to move the input curve with interactive playback you won’t actually be seeing any changes or simulation. We need to assign goal values to the particles to ensure an even follow through. Select the particle from the outliner and from the component mode select each particle and assign a goal weight from the component editor. The less the goal weight the softer the result you get while higher value gives stiffer result. Check out the dynamics by doing an interactive playback and moving the input curve, you should see nice soft body simulation.
It’s just a matter of assigning a Spline IK setup for the joint chain using the output curve as spline curve! Like hair system dynamics you can also assign different kinds of physical fields and dynamic constraints to play with. Start for example with a gravity field. Feel free to experiment with different setting. You can also assign a collision object from particle menu item for selected soft body particle system!
Try playing with goal smoothness and goal weight attributes from soft body particle shape node (Goal smoothness smooth-en the motion (Dampening); while goal weight behaves the same as start curve attract does for hair system). Also, to get some interesting effects to simulate turbulence or funky movement you can always connect the dynamic attributes to be controlled by custom math expression. For example;
//randomize the number between 0.5 to 1 and feeds into the goal weight attribute with change in time
goal weight = rand (0.5, 1)
Example Scene File: I have attached two maya scene files; which includes a dynamic joint chain and a funky chunky jelly like character using soft body dynamics. Try moving the control object with interactive playback:
softbody_dynamics.rar
Here are some of the links for soft body simulation:
PhysiX
I have used maya’s built in dynamics for a wide array of production environment. I have found out the tools to be user friendly and with proper setting and tuning you get a good result but however using complex simulation tends to be very hardware intensive with sluggish performance.
I have heard of nVidia physiX plugin for sometime; even got to play with it and I have to say it is pretty good and fast to compute at the same time. The integration of the plugin with nVidia’s own graphics processing unit brings magic.
Check it out!
Physx youtube page (Some really cool videos here)
Note: When working with dynamic simulation, please make sure to set the playback speed to play every frame!
General Notes/Summary on Soft Body Dynamics!
Soft body dynamics is used to simulate the motion for deformable objects. When an object is made into a soft body, a particle system is created, with one particle for each vertex (or CV). Each of these particles are set to a certain goal value which can be altered and animated. A goal is an object that particles seek out and cluster around the particles trying to align themselves with the vertices of the goal object. In simple words it is the weight/power value determining the ability of a dynamic body to deform. We can always use Paint Soft Body Weight or Component Editor to manipulate and simulate the movement of any part of a deforming object to be more dynamic or soft/rigid than other. Something to keep in mind while creating a soft body is to use Make Non - Soft a Goal. By using, Duplicate, Make copy Soft and Make Non-Soft a Goal options when creating a soft body, you'll have a soft body that remembers its original shape and tries to return to it and is very useful if you wish to keep the shape of the deforming object intact. Fields and collisions can affect the geometry of the object with change in the position of particle objects to bring in changes in movement or animation. In general, soft bodies should be thought of as particle systems where the particles just happen to be joined up with triangles!
Tip #04 / Rigid Body Dynamic Rigging
Rigid bodies are objects that do not deform under collisions. What if we want to simulate a motion of non deformable objects such as a brick falling off a wall or a bullet firing off a gun or simulate the movement of body armor suit for a super hero character!
In this post I will be going through an overview, tips and techniques that can be implemented to create such physical motion which will add more life to a character being animated and the surrounding environment as well.
Rigid body dynamics can be applied to nurbs and polygon only!
Rigid body can be categorized into active and passive objects. Active bodies are objects that react to dynamics, such as fields and constraints while Passive bodies allow for collisions with active rigid bodies.
To create a rigid body, select an object and go to:
Soft/Rigid Bodies>Create Active Rigid Body
Soft/Rigid Bodies>Create Passive Rigid Body commands.
A general note that can be implemented on any dynamics object is collision layers. This is used to limit rigid body from interacting with other rigid bodies and greatly speeds up the dynamic simulation with lesser slow down or occasional crash! Make sure to use this attribute wisely from the rigid body settings.
You can assign different fields to create animation on a rigid body. For example, try assigning a gravity field and you should see the rigid body fall!
Interaction with other rigid body also causes animation!
Animating Rigid Body With Constraints
There are a number of dynamic constraints that can be applied on any given rigid object. To create a constraint, select any rigid body object and go to:
Soft/Rigid Bodies>Create Constraint>
Some of the constraints that are available are as follows. Remember, these constraints are powerful tools and can be implemented to create simple to complex physical movements! Use them wisely ;)
Nail: Used for maintaining a set distance between a point and the center of the rigid body; as if a rigid bar connected between the two.
Pin: Used for connecting two objects with a linkage.
Hinge: Used for simulating a hinge connecting two items to allow for rotation about an axis
Spring: Use for simulating elastic effect or spring like movement.
Barrier: Used for creating an infinite collision plane for any given rigid object.
Example Scene File: I have created an example file simulating the movement of a ball on a bat (Ping Pong ball and a bat) with elastic effect. The ball in the example file is a active rigid body while the bat and the collision plane are passive rigid body. A spring constraint have been applied to the ball to simulate elastic movements. The constraint node is parented to the bat which is a child of the control object. Try moving the controller with interactive playback :)
rigidBody_dynamic_batBall.rar
Also, similar technique have been applied on creating this rope bridge :
rigidBody_dynamic_ropeBridge.rar
You can apply similar principles to create a dynamic rig to drive animating requiring visually realistic physical movements! Try experimenting to create a ball bounce animation, for example could be a ping pong ball, tennis ball, football and a bowling ball. Just alter the values for the attributes in the rigid body settings such as for example Mass.
Some links worth checking!
THE FINAL CHAPTER “nCloth Dynamic Rigging”
OK! So the final lesion covers the power of nCloth dynamics. nCloth is normally used to simulate the motion of cloth or fabric. But this is not always the case. nCloth can be used to simulate a wide array of physical bodies ranging from water balloons to hard bodies like rocks by tweaking the altering the values on nCloth settings and nucleus setting. nCloth can also be used to simulate complex deformation on body including musculature and facial. This is usually achieved by layering the nCloth dynamics to the existing rig. nCloth can be applied to existing skinned or bounded geometry (any deformer applied) to create a dynamic overlay to simulate complex skinning, musculature, skin sliding or clothing objects!
nCloth can be applied to a selected geometry by hitting on Create nCloth from the nDynamics menu set. A passive nCloth collider can be applied to simulate collisions. For example try creating a simple polygonal plane and a polygonal sphere. Move the plane above the sphere. Apply nCloth to the plane and apply nCloth passive collider to the sphere. Apply a gravity field to the plane by selecting the plane and hitting gravity field from the Field menu item. Now just hit the interactive playback. You should be able to see that the plane falls down and collide to the collision sphere just like a piece of fabric falling on a table. You can further adjust the settings from the nCloth’s dynamic properties setting to enhance the behavior and the looks. Try going through some of the presets available such as airbag, water balloon, tshirt, silk, etc. Try going through the values and settings!
nCloth support a wide range of constraints and fields to control the animation and behavior of the deforming geometry.
Tip#05 “Input Mesh Attract”
This is a powerful feature integrated inside of nCloth. This is something which is similar to start curve attract in the hair dynamic system. For example, if you have a nCloth applied on top of an existing skincluster node applied to the geometry, you can increase and decrease the value of input mesh attract attribute from dynamic property to control the attractiveness of input mesh. This is very useful, especially for cases such as simulating musculature or facial deformation which are initially driven by rigged joints. Also, you can also paint the input mesh attract weight value just like doing a paint skin weight operation to control the attraction from Paint Vertex Weight option box!
You can download a simple file that I have creating for a wing rig using nCloth driven by input mesh attract attribute. To simulate the wing flying under air turbulence, a turbulence field has also been added. Try rotating the wing controller under interactive playback:
nCloth_dynamic_wing.rar
Similar technique can be implemented to simulate clothing and wardrobe deformed by animated character.
Some useful links for nCloth Dynamics:
THE END
Please go through the scene files, go on and
deconstruct them to see what's going underneath the hood. Once again thank
you all and please feel free to contact me for any questions, queries, comments
and ideas. I wish you all the very best :)
P.S. A special thanks to entire Rigging Dojo team for appreciating my work and giving me the privilege to share this topic over at Rigging Dojo.


 I have always been fascinated watching cartoons and playing video games from my childhood. I am a real curios person, always wanting to know how! How do they do that!? Well that might be the reason I became a RIGGER! RIGGING is awesome; you get to create a digital PUPPET … the very essence of an illusion of life! Well then let’s get back to the topic. The main focus of this course is Dynamic Rigging. Yeah, Dynamic + Rigging = More Rigging Awesomeness!
 People generally tend to see that the hair system is primarily used for stuffs like creating beautiful silky dynamic hair for render. But that is not the case, we as a rigging artist can use the power of hair system to recreate powerful simulation to drive complex animation. You can quickly create Hair on any given surface very easily. Just select the geometry (nurbs surface or polygon with proper UV unwrapped), go to dynamic menu set, click on hair, click the option box to create hair, make sure output is set to nurbsCurve and hit apply. That’s it! Run the interactive playback, move the geometry and walllaaa you have beautiful hair dynamics going on.


